How to Measure Ring Size at Home?
Have you ever experienced that awkward moment when a carefully chosen ring keeps slipping off, or you struggle to put it on only for it to get stuck at the knuckle and be hard to remove? Seemingly small differences in ring size can seriously affect how a ring feels to wear and may even harm your finger or the precious jewelry itself.
In an age when buying jewelry online is increasingly common, knowing how to accurately measure ring size at home has become an essential skill for every jewelry lover. Whether you’re choosing an everyday ring for yourself or planning a romantic marriage proposal, mastering the correct way to measure ring size is crucial.
This article will systematically answer several core questions: how to measure ring size, how to find an accurate ring size at home, how to use a ring size conversion chart correctly, and when you need professional ring measuring tools.
As a brand focused on high-quality custom jewelry, LUO Jewelry understands how important precise sizing is to a perfect wearing experience. We not only provide customers with detailed sizing guidance but also offer professional customization services to ensure each ring fits your finger perfectly and becomes your unique jewelry companion.
What Is Ring Size & How Does It Work?
Before diving into measurement methods, we first need to understand what ring size is. Ring size is actually determined by the inner circumference or inner diameter of the ring band. Simply put:
- Circumference: the length around the inside of the ring band, usually measured in millimeters (mm)
- Diameter: the inside diameter of the ring band, also measured in millimeters
These two values have a mathematical relationship: Circumference = Diameter × π (approximately 3.14)
Different Countries’ Ring Size Standards
It’s important to note that jewelry industries around the world have developed different ring size labeling systems over time:
- US Size: uses a numeric system, commonly ranging from 3 to 13. Women's average ring size typically fall between sizes 5–7, and men's average ring size is between 8–10. Each full size differs by about 0.4 mm in diameter.
- UK Size: uses letters from A to Z, with common female sizes around J–M and male sizes around S–V.
- EU Size: uses the inner circumference in millimeters directly, e.g., 52 means a 52 mm circumference—this is relatively intuitive and easy to understand.
- Asian Sizes: some Asian countries have their own systems, but many align with the European standard or adopt the US system directly.
Understanding these different sizing systems is crucial when buying jewelry across borders, because the same finger might be a US size 6, a UK size L, and an EU size 51.9. This variation makes a ring size conversion chart indispensable; it helps you accurately convert between standards and avoid purchasing mistakes due to misinterpreting size labels.
Why Precise Ring Sizing Matters?
Ring sizing requires greater precision than clothing or shoes. Because finger size varieswithin a small range, even a half-size difference can markedly change how a ring feels. A ring that’s too small can restrict blood flow to the finger—long-term wear may cause swelling or numbness. A ring that’s too large can rotate or slip off during daily activities, affecting appearance and increasing the risk of loss. More importantly, many rings made from special materials or with intricate craftsmanship are difficult to resize after completion; this means your initial size choice must be correct, otherwise you might face an unwearable piece or the need for remaking.
As LUO Jewelry designers often say: “A perfect ring is a second skin for the finger.” That’s why we insist on providing precise sizing guidance to every customer.
How to Measure Ring Size at Home?
Once you understand the basics of ring sizing, let’s move on to the most practical part: how to accurately measure ring size at home. Below are four methods ranging from simple to professional—you can choose based on the tools you have and how precise you need to be.
Method 1: Use a String or Paper Strip
Using a soft string or a paper strip to measure your finger’s circumference is the simplest at-home method. Its biggest advantage is that the tools are very common—almost every household can easily find suitable materials.
You’ll need:
- A non-stretch thin string, dental floss, or a paper strip
- A ruler (preferably with millimeter markings)
- A pen or marker
Step-by-step guide:
Step 1: Choose the right time
Before measuring, be careful to pick the right time of day, because finger size changes slightly throughout the day. Fingers may be a bit swollen upon waking due to overnight fluid distribution, while by late afternoon or evening they tend to be more stable. Professional jewelers usually recommend measuring in the afternoon or evening because finger size then is closest to the average daily-wearing state, giving a more representative measurement.
Also make sure the measurement environment is at a moderate temperature. Avoid measuring right after a hot shower because blood vessels expand and fingers appear larger; likewise, don’t measure in a cold environment since fingers can shrink and give a smaller measurement.
Step 2: Wrap around the finger
Wrap the prepared string or paper strip around the widest part of the finger joint (the knuckle) of the finger where you plan to wear the ring, because the ring must pass over this area when being put on. If you only measure the base of the finger and ignore the knuckle’s width, the ring may not slide on smoothly.
Engagement rings and wedding rings are typically worn on the left ring finger, while fashion rings can be worn on any finger by preference. Note that different fingers vary in size, and even the same finger on left and right hands can differ, so you must measure the specific finger you actually intend to wear the ring on.
Step 3: Mark the overlap
When the ends of the string or paper strip overlap on the finger, mark the overlap clearly with your pen. The accuracy of this mark directly affects the final measurement, so use a fine-tip pen to minimize error from the mark itself.
When deciding on the right tightness, strike a subtle balance: the string should not be so tight that it digs into the skin and leaves indentations, nor so loose that there’s a noticeable gap. A practical rule is that you should be able to barely slide a thin piece of paper between the string and your finger—this tightness ensures the ring can pass over the knuckle while not being too loose to fall off easily in daily wear.
Step 4: Measure the length
Take the marked string or paper strip off the finger and lay it flat against the ruler. Measure the straight-line distance between the two marks—that value is the circumference of your finger.
To increase reliability, repeat the whole process at least three times. If the three measurements differ by less than 1 millimeter, take their average as the final value. If the differences are larger, the measurement method may be flawed and should be adjusted.
Step 5: Convert to ring size
Compare the measured circumference (mm) with the ring size chart provided later in this article to convert to a ring size—for instance, a 51.9 mm circumference corresponds to U.S. size 6.
🔴 Limitations: This method’s accuracy is about 85–90% and is suitable for budget-friendly everyday rings. For high-value custom jewelry, a more precise method is recommended.
Method 2: Measure an Existing Ring
If you already have a ring that fits comfortably, measuring its inner diameter to determine size is a more accurate method. This assumes you have a ring that you normally wear on the target finger and that it feels comfortable—neither too tight to cause pressure nor so loose that it frequently rotates or slips off.
Tools needed:
- A ring that fits well
- A ruler or caliper (digital vernier caliper is best)
- A printable ring sizing guide (optional)
Step-by-step guide:
Step 1: Measure the ring’s inner diameter
Lay the ring flat on a hard, even surface and view it from directly above to ensure your line of sight is perpendicular to the ring’s plane; this avoids parallax error.
The measurement target is the diameter of the inner ring, specifically the straight-line distance from one end of the inner wall to the opposite end. It should be noted that the measurement position should be chosen at the widest point through the center of the circle, rather than randomly selecting the width in a certain direction.
If you are using a ruler for measurement, the measurement process requires great care to control the error within 0.1 millimeters. To reduce errors, the measurement direction can be changed multiple times, and the diameter can be measured from different angles and averaged. If a digital caliper is used, the operation is relatively simple. You only need to insert the two measuring claws of the caliper into the inner ring of the ring and gently expand them to make close contact with the inner wall, then read the value on the display screen.
Step 2: Refer to the ring size chart
Convert the measured inner diameter values to the ring size table provided later in this article and find the corresponding size. For example, an inner diameter of 16.5mm corresponds to US No. 6.
🟡 Accuracy: This method has an accuracy of over 95% and is particularly suitable for purchasing rings of similar styles.
Method 3: Print a Ring Size Chart
A printable ring size chart combines traditional measurement methods with modern digital technology, offering consumers an option between fully self-measuring and professional tool measurement. The core of this method is a precisely designed PDF document containing true-to-scale inner-diameter circles or cut-out paper measuring strips. Users can download, print, and follow the instructions to obtain relatively accurate size information.
Step-by-step guide:
Step 1: Download the official printable ring size template
When choosing a download source, prioritize the official websites of professional jewelry brands, because their measuring tools are usually strictly verified and calibrated to ensure accuracy. LUO Jewelry provides a printable size chart based on international standard sizing; it includes U.S. sizes and corresponding European and U.K. sizes, making it convenient for customers in different regions to use.
👉 Click to download for free: LUO Jewelry printable size chart
Step 2: Set printer parameters
Printer settings directly affect final measurement accuracy, so follow these parameters:
- Set printing to "Actual Size" or "100% scale"
- Do not choose "Fit to Page" or any scaling option
- Use standard A4 white paper for printing
Step 3: Verify print accuracy
The first step after printing is to verify print accuracy. Almost all professional printable ring size charts include a calibration ruler in the document—usually a straight line labeled 50 mm or 100 mm. Use a precise ruler to measure this calibration line. If the measured value exactly matches the labeled length, the print scale is correct and the chart can be used; if there is a discrepancy, the print settings are incorrect and you should adjust and reprint.
This verification step is simple but extremely important, because even a 2% printing scale error can lead to a half-size or full-size difference.
Step 4: Measure ring size
- Method A (Measure the finger):
Some printable charts provide a cut-out measuring strip. Carefully cut along the dashed line. After cutting, wrap the strip around your finger. The strip usually has a slot or alignment marks; follow the instructions to insert one end into the slot or align the ends at a mark. The size shown on the strip at that point is your finger size.
This method is essentially an improved paper-strip wrap technique. Preprinted scales eliminate the need to measure circumference with a ruler, making it easier to use. Accuracy depends on ensuring the strip is not stretched or deformed during cutting and use.
- Method B (Measure a ring):
If you have an existing ring that fits well, lay it flat on the printed page and compare it to the size circles to find the inner-diameter circle that matches exactly. The number beside that circle is the ring size. When comparing, make sure the ring lies completely flat on the paper and view it from directly above to check alignment between the ring’s inner circle and the printed circle. A perfect match means the ring’s inner wall aligns exactly with the circle line—no gap and no overlap.
🟠 Accuracy: When done correctly, this method can reach 90–95% accuracy. Its main advantages are convenience and cost-effectiveness—users can perform a relatively professional measurement at home without specialized tools.
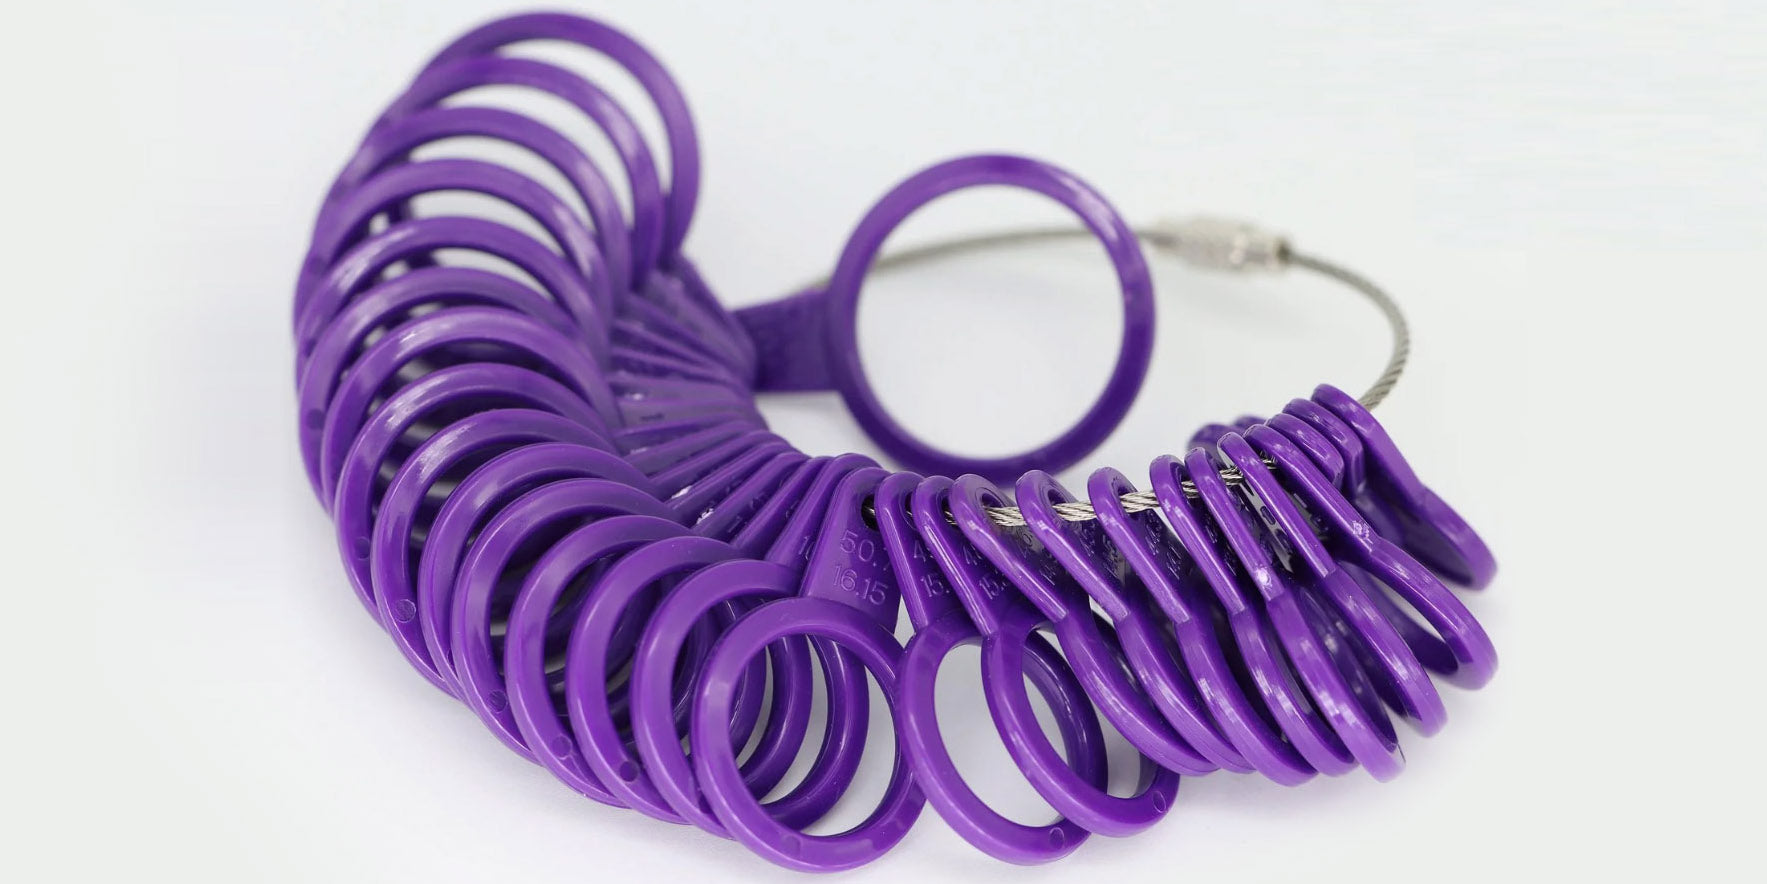
Method 4: Use a Ring Sizer Tool
Professional ring measuring tools represent the most accurate home-measurement option and are strongly recommended for custom jewelry or high-value ring purchases.
What is a Ring Sizer?
A ring sizer is a consumer-friendly version of a professional jewelry tool, mainly falling into two types:
1. Ring Sizer Belt:
An ring sizer belt is usually made of high-strength plastic or metal and looks like an adjustable ring. It has a precise gear or ratchet mechanism to change sizes.
To use it, place the adjustable sizer on your finger and turn the adjustment mechanism to change the inner diameter until you find a size that slides over the knuckle but isn’t too loose at the base. The outer side typically shows U.S. size markings; some higher-end models also show European and U.K. sizes. When the fit is right, read the value on the scale to get your ring size.
2. Ring Sizer Set:
A standard ring sizer set is a collection of metal or plastic sample rings, each precisely corresponding to a standard size and clearly labeled. The set is usually held on a metal ring for storage and use. The size range typically covers common sizes from 1 to 17, and some professional sets include half sizes for finer selection.
To use a standard ring set, try the sample rings one by one, starting from a smaller size and working up until you find the first ring that slides over the knuckle relatively easily but doesn’t noticeably wobble at the base—this is the appropriate size. This method fully simulates wearing a real ring, so it most accurately reflects actual comfort and security.

How to Get a Ring Sizer?
There are two main ways to get a ring sizer:
- Buy one from an online shopping platform: ring sizers can be purchased on e-commerce sites like Amazon, typically costing $5–$20.
- Request one from a jewelry brand for free: many professional jewelers, especially those focused on online sales, offer free measuring tools to potential customers.
As a brand committed to an excellent customer experience, LUO Jewelry offers potential customers a free mailed ring sizer. For custom rings in particular, we adhere to the principle “measure first, design second,” because even the most exquisite design can be ruined by the wrong size.
👉 Get LUO Jewelry’s Standard Ring Sizer Set For Free!
🟢 Accuracy: a professional ring sizer can be 98–99% accurate, comparable to the measurement level in jewelry stores. We recommend testing at different times (morning/evening, warm/cold conditions) and repeating measurements to get the most accurate ring size.
Ring Size Chart
Below is the standard UK–US ring size conversion chart, covering inner diameter, circumference, and common gender size distributions.

The inner diameter difference between two adjacent full sizes is about 0.8 mm. Although this difference seems small, it can make a noticeable difference in actual wear—this is why many jewelers offer half sizes. A half size like 6.5 has an inner diameter of about 16.9 mm, exactly between sizes 6 and 7, providing a more precise option for those who find size 6 a bit tight and size 7 a bit loose. LUO Jewelry’s custom service supports all standard full and half sizes and can even accommodate special requests. This high level of size customization comes from our dedication to a perfect wearing experience.
U.S. Women’s Ring Size Distribution
- Average ring size: 6–7
- Most common: 5–7 (about 70% of women)
- Smaller sizes: 3–4
- Larger sizes: 8–9
U.S. Men’s Ring Size Distribution
- Average ring size: 6–7
- Most common: 9–11 (about 65% of men)
- Smaller sizes: 7–8
- Larger sizes: 12–14
How to Find Ring Size Without Measuring?
There are indeed situations in real life where you can’t directly measure someone’s finger size—for example, if you want to surprise your partner with a proposal, or pick out a gift for a relative or friend who lives far away. In these cases, any direct measurement could reveal the secret and ruin the surprise, so you need to use more discreet and clever alternatives to determine ring size.
Scenario 1: Romantic Proposal Surprise
Method 1: Borrow an existing ring
The key to this method is choosing the right reference ring. It must be a ring your partner frequently wears on her left ring finger and finds comfortable, because sizes vary across fingers and a ring from another finger won’t accurately represent the ring finger. To carry out this plan, pick the right time—for example, while she’s traveling or on a business trip—so you have a few days to borrow the ring for measurement or even take it to a jeweler to confirm the size professionally.
Method 2: Use a ring impression
If you can’t borrow the ring for long, you can press her frequently worn left-ring-finger ring into soap or soft clay while she’s briefly out, leaving an impression. Measure the inner diameter and circumference of the impression and compare them to a ring size chart to find the correct size. You can also take the item with the impression to a jeweler and ask a professional to measure it. This method’s accuracy is roughly 80–85%.
Method 3: Measure while she’s asleep
If you can’t find a suitable existing ring, you could measure her finger while she’s asleep at night using the string or paper-strip method described earlier, or use a professional ring sizer at a jeweler to quickly get her engagement ring size. Remember to hide any measurement tools afterward so you don’t spoil the surprise.
Method 4: Ask her close friends or family
Asking the partner’s close friends or family is the most reliable indirect way to obtain the engagement ring size, because these people are often close to your partner and may already know her ring size—or they can help by accompanying her shopping or suggesting trying on rings in a way that feels natural while obtaining accurate sizing information.
Scenario 2: Buying a Gift Remotely
Method 1: Estimate by body type
If you cannot get any direct or indirect ring size information at all, estimating based on the recipient’s body type is a last resort—but be clear that its accuracy is very limited. Statistics show a certain correlation between height and finger size:
- Women's height under 5'3'': often size 5–6
- Women' height between 5'3'' and 5'7'': often size 6–7
- Women's height over 5'7'': often size 7–8
Important warning: This method has an error rate as high as 30–40% and should only be used as a last resort, because finger thickness is not fully correlated with overall body type, individual differences are large, and it is not recommended for valuable jewelry.
Method 2: Choose an adjustable ring
A safer alternative is to choose rings designed to be somewhat adjustable. Some modern jewelry designs feature open rings or rings made with flexible materials that can adjust over a certain range; these typically accommodate two to three adjacent sizes. While they may be less traditional in appearance and symbolism than a continuous band, as a gift they effectively reduce the risk of incorrect sizing.
Method 3: Buy a gift card + choose together
Another way to completely avoid sizing risk is to change the gift from a physical ring to a jewelry customization voucher. You can buy a custom service gift card from LUO Jewelry and present it beautifully to the recipient. Explain that the gift card can be used for jointly selecting and customizing a unique ring—this not only solves the sizing problem but also adds the emotional value of choosing the design together, turning the gift into a shared creative memory.
Common Mistakes When Measuring Ring Size
Even if you know measurement methods, the following common mistakes can still lead to incorrect sizing. Knowing these pitfalls can significantly improve accuracy.
1. Ignoring Temperature-related Changes in Fingers
The circumference of a person’s finger can change measurably with ambient temperature and physical condition. In cold environments, blood vessels in the fingers constrict, making fingers thinner; this shrinkage can reduce circumference by 0.5 to 1 millimeter, roughly a half-size to a full-size difference. In hot environments or right after exercise, blood vessels dilate and fingers become noticeably thicker, which can also cause half-size or larger deviations.
More subtly, even at a constant room temperature, finger size can vary at different times of day. Upon waking, fingers may be slightly swollen due to overnight fluid redistribution. After morning activity and by midday, fingers are often closer to their normal size, while by evening, daily activity and gravity can cause fingers to swell a bit again.
Correct Pactice:
- Measure in a room-temperature environment (20–25°C / 68–77°F)
- Avoid measuring right after a hot shower, immediately after exercise, or in extreme weather
- Ideal time: afternoon or evening, when the finger is at its daily average state
2. Using the Same Size for Different Fingers
Many people mistakenly assume all their fingers are the same size or that corresponding fingers on left and right hands match. In reality, the sizes of all ten fingers can vary. A main reason is that the dominant hand is used more frequently, causing slight differences in muscle and bone development—for example, a right-handed person’s right fingers are often a bit thicker; the opposite is true for left-handed people.
Correct Practice:
Be sure to measure the specific finger you plan to wear the ring on. For wedding or engagement rings, measure the left ring finger. For fashion rings, measure the finger where you intend to wear the ring based on design and personal habit.
3. Ignoring the Effect of Ring Width
The wider the ring, the larger the size needed for comfortable wear. A wider band covers more of the finger’s surface and requires more room to pass over the knuckle, and it exerts more pressure on the finger during prolonged wear.
The impact of ring width on required size is often overlooked. The principle is that a wide ring covers more surface area, needs more space to slide over the knuckle, and feels tighter at the base of the finger than a narrow ring with the same inner diameter.
Rule of Thumb:
- 2–4 mm width (narrow): choose the standard ring size
- 5–8 mm width (medium): increase the ring size by 1/4 to 1/2 size
- 9 mm and above (wide): increase the ring size by 1/2 to 1 full size
4. Measuring at the Wrong Time
Measuring at an inappropriate time can produce sizing data that doesn’t reflect everyday wear. Besides the temperature and time-of-day factors already mentioned, some special physiological states can affect finger size:
❌ Just after waking, fingers may be puffy
❌ After drinking alcohol, vessel dilation can make fingers thicker
❌ Around menstruation, hormonal changes can cause mild whole-body water retention
❌ After a high-salt meal, the body may retain water and temporarily swell
❌ After long flights, pressure changes and prolonged sitting can cause hand swelling
Best Times to Measure:
✅ Afternoon or evening
✅ After normal eating and routine activity
✅ Measure over several days and take the average
5. Using Measuring Tools Incorrectly
Some common causes of inaccurate ring sizing include using a cord or paper strip that’s too wide (adding thickness), wrapping that creates thickness error, a ruler with inaccurate markings or reading at an angle, printing a size chart at the wrong scale, or measuring too tightly or too loosely.
Correct Practice:
- Use a paper strip no wider than 6 mm
- If using string, choose a thin type and ensure the material has no obvious elasticity
- Use a precise ruler with millimeter markings, and view the scale straight-on (perpendicular to the ruler)
- Verify calibration lines after printing
- Wrap with a snugness that allows sliding in a thin piece of paper
6. Measuring Only Once
A single measurement can have large random error because many subjective factors affect the process: how tightly the strip is wrapped, accuracy of marking, carefulness when reading the measurement—any small deviation in these steps can affect the final result.
Correct Practice:
Take at least three independent measurements. Measure at different times of day—morning, noon, and evening—and use the middle value or average. If the three results differ by more than 1 mm, consider using a more precise measuring tool.
Tips for Getting the Perfect Fit
After mastering measurement methods and avoiding common mistakes, you still need some practical judgment to turn measurement data into a final ring size. The following rules of thumb will help you make the best decision.
Tip 1: How to Choose Between Two Ring Sizes?
If your measurement falls exactly between two standard sizes (for example, between size 6 and 6.5), what should you pick?
Choose the Larger Size If:
✅ The ring width is over 6 mm
✅ Your knuckle is noticeably larger than the base of your finger
✅ You live in a warm climate
✅ The ring is a full-band design (no opening)
✅ This is a ring you plan to wear long-term (e.g., a wedding band)
Choose the Smaller Size If:
✅ The ring is narrow (2–4 mm)
✅ Your finger is fairly even and knuckles aren’t prominent
✅ You live in a cold climate
✅ This is a fashion accessory that doesn’t need frequent removing
If you really can’t decide, choosing the slightly larger size is usually safer because a ring that’s too small can cause discomfort or even injury, while a ring that’s too large can be adjusted with sizing inserts or beads. Also, for long-term wear you generally want a slightly looser fit to avoid affecting circulation.
Tip 2: Consider the Effect of Ring Material
Traditional precious metals like platinum and gold have higher density, so rings of the same size weigh more. Over long periods, that weight tends to pull the ring toward the fingertip, so precious metal rings are generally recommended in the standard size or slightly tighter to offset gravity.
By contrast, titanium and tungsten are strong but have lower density, so rings of the same size are lighter and less likely to slide off from their own weight. Rings made of these materials can be chosen a bit more loosely for comfort. However, note that titanium and tungsten are extremely hard and are nearly impossible to resize after production, so you must be especially careful when choosing the initial size.
Tip 3: Consider Seasonal Changes
Seasonal size changes are easy to overlook but do occur. Many people find the same ring feels tighter in summer than in winter because higher temperatures cause blood vessels to dilate and fingers to swell slightly. The amount varies by person but is typically in the 5%–10% range, roughly equivalent to a quarter to a half size difference.
How you respond depends on your local climate. If you live in a region with big seasonal temperature swings, choose based on your warm-season finger size; if you live where temperatures stay relatively stable year-round, choose the size that fits your average condition.
Tip 4: The "Comfort Rule" — Final Test
No matter the measurement method, the ideal ring size should meet these criteria:
✅ Slides over the knuckle with slight resistance: needs a little force but won’t get stuck or hurt
✅ Doesn’t fall off easily: won’t slip off when your hand is relaxed at your side
✅ Can be gently rotated: you can turn the ring with your other hand but it won’t rotate on its own
✅ Can be removed without difficulty: you can take it off with gentle turning and pulling—no need for soap
✅ Comfortable for long wear: after 2–3 hours the finger shouldn’t show noticeable indentations or numbness
Summary
With this detailed and comprehensive guide, you now have all the knowledge and skills needed to accurately measure ring size at home. From understanding the basics of ring sizing and differences between international standards, to learning four measurement methods with varying accuracy and use cases, to using size conversion charts and indirect techniques for special situations, these elements form a complete ring-sizing system so you can find solutions in any scenario.
You now have the knowledge and confidence to find the perfect ring size—whether you’re choosing an everyday fashion ring for yourself, preparing a romantic engagement surprise for a partner, or selecting matching wedding bands that symbolize eternal commitment. Accurate sizing is the first step toward a perfect experience.
LUO Jewelry has always prioritized ring sizing accuracy in our years of jewelry service. Our design philosophy is that every ring should be a uniquely tailored piece for the wearer, and that tailoring starts with an exact fit. We have invested heavily in a full support system—including providing free ring sizer tools and remote professional guidance—so each customer receives accurate size data and ultimately enjoys a perfect wearing experience.
If you have more questions about ring sizing, feel free to consult our jewelry experts at any time.